Moving Camera in 3D Space - Demo 17
Objective
Make a moving camera in 3D space. Use Ortho to transform a rectangular prism, defined relative to camera space, into NDC.
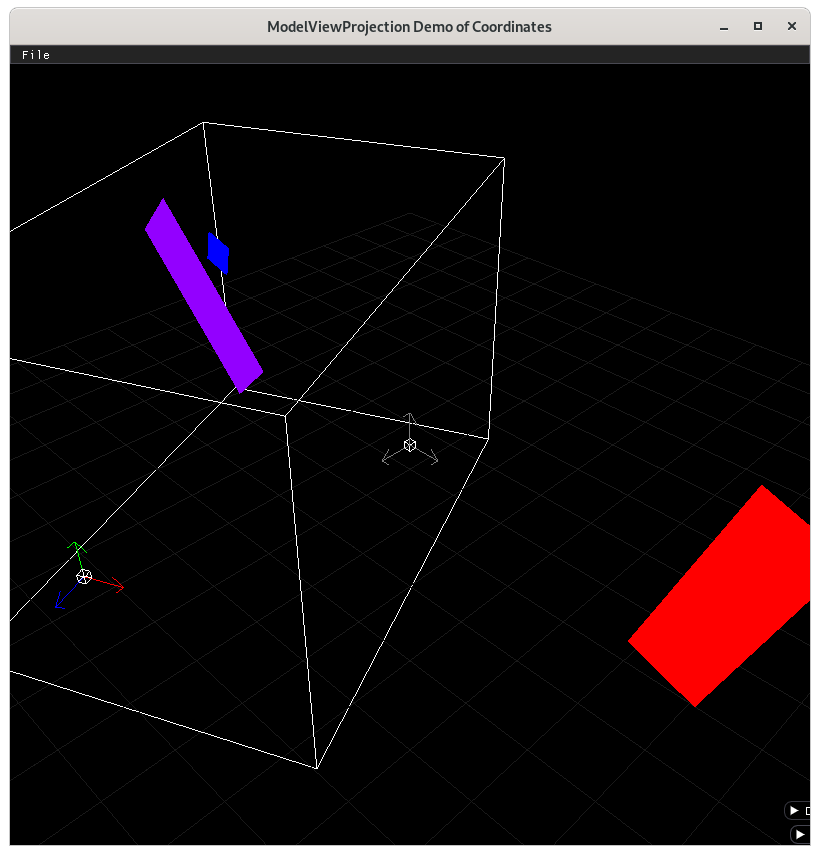
Camera space with ortho volume
Problem purposefully put in
When running this demo and moving the viewer, parts of the geometry will disappear. This is because it gets “clipped out”, as the geometry will be outside of NDC, (-1 to 1 on all three axis). We could fix this by making a bigger ortho rectangular prism, but that won’t solve the fundamental problem.
This doesn’t look like a 3D application should, where objects further away from the viewer would appear smaller. This will be fixed in demo17.
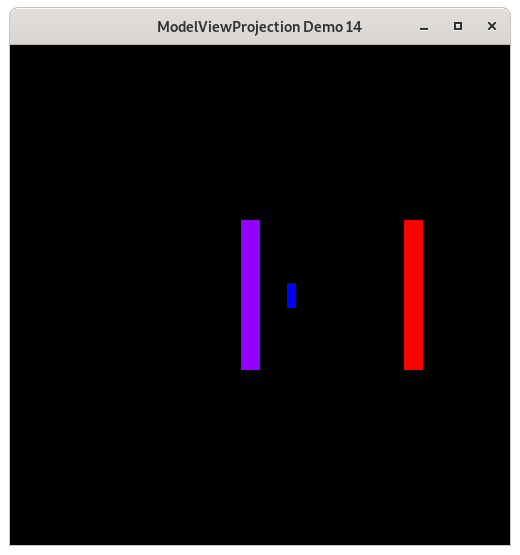
Demo 16, which looks like trash
How to Execute
Load src/modelviewprojection/demo17.py in Spyder and hit the play button.
Move the Paddles using the Keyboard
Keyboard Input |
Action |
|---|---|
w |
Move Left Paddle Up |
s |
Move Left Paddle Down |
k |
Move Right Paddle Down |
i |
Move Right Paddle Up |
d |
Increase Left Paddle’s Rotation |
a |
Decrease Left Paddle’s Rotation |
l |
Increase Right Paddle’s Rotation |
j |
Decrease Right Paddle’s Rotation |
UP |
Move the camera up, moving the objects down |
DOWN |
Move the camera down, moving the objects up |
LEFT |
Move the camera left, moving the objects right |
RIGHT |
Move the camera right, moving the objects left |
q |
Rotate the square around its center |
e |
Rotate the square around paddle 1’s center |
Description
Before starting this demo, run mvpVisualization/modelvieworthoprojection/modelvieworthoprojection.py, as it will show graphically all of the steps in this demo. In the GUI, take a look at the camera options buttons, and once the camera is placed and oriented in world space, use the buttons to change the camera’s position and orientation. This will demonstrate what we have to do for moving the camera in a 3D scene.
There are new keyboard inputs to control the moving camera. As you would expect to see in a first person game, up moves the camera forward (-z), down moves the camera backwards (z), left rotates the camera as would happen if you rotated your body to the left, and likewise for right. Page UP and Page DOWN rotate the camera to look up or to look down.
To enable this, the camera is modeled with a data structure, having a position in x,y,z relative to world space, and two rotations (one around the camera’s x axis, and one around the camera’s y axis).
To position the camera you would
translate to the camera’s position, using the actual position values of camera position in world space coordinates.
rotate around the local y axis
rotate around the local x axis
To visualize this, run “python mvpVisualization/modelvieworthoprojection/modelvieworthoprojection.py”
The ordering of 1) before 2) and 3) should be clear, as we are imagining a coordinate system that moves, just like we do for the modelspace to world space transformations. The ordering of 2) before 3) is very important, as two rotations around different axes are not commutative, meaning that you can’t change the order and still expect the same results https://en.wikipedia.org/wiki/Commutative_property.
Try this. Rotate your head to the right a little more that 45 degrees. Now rotate your head back a little more than 45 degrees.
Now, reset your head (glPopMatrix, which we have not yet covered). Try rotating your head back 45 degrees. Once it is there, rotate your head (not your neck), 45 degrees. It is different, and quite uncomfortable!
We rotate the camera by the y axis first, then by the relative x axis, for the same reason.
(Remember, read bottom up, just like the previous demos for modelspace to world-space data)
Back to the point, we are envisioning the camera relative to the world space by making a moving coordinate system (composed of an origin, 1 unit in the “x” axis, 1 unit in the “y” axis, and 1 unit in the “z” axis), where each subsequent transformation is relative to the previous coordinate system. (This system is beneficial btw because it allows us to think of only one coordinate system at a time, and allows us to forget how we got there, (similar to a Markov process, https://en.wikipedia.org/wiki/Markov_chain))
But this system of thinking works only when we are placing the camera into its position/orientation relative to world space, which is not what we need to actually do. We don’t need to place the camera. We need to move every already-plotted object in world space towards the origin and orientation of NDC. Looking at the following graph,
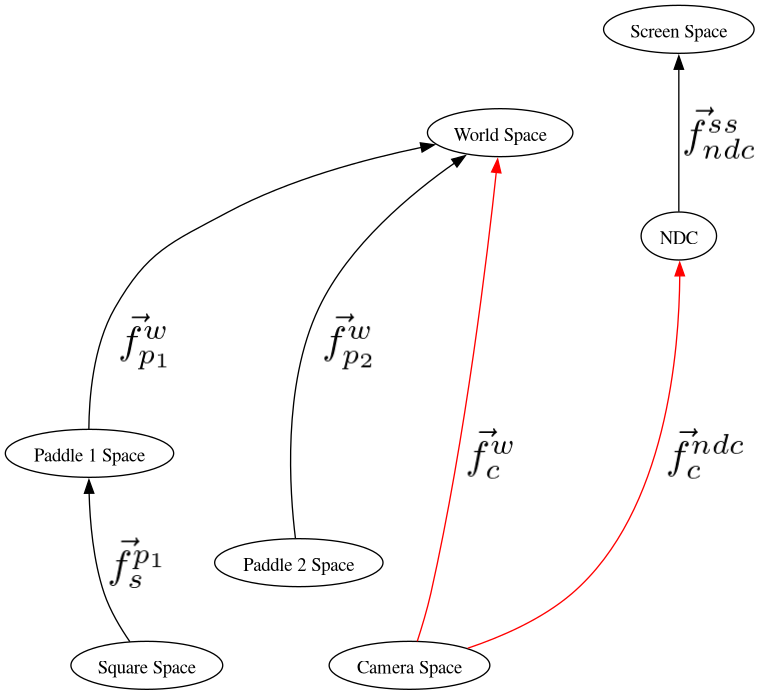
Demo 16
We want to take the modelspace geometry from, say Paddle1 space, to world space, and then to camera space (which is going in the opposite direction of the arrow, therefore requires an inverse operation, because to plot data we go from modelspace to screen space on the graph.
Given that the inverse of a sequence of transformations is the sequence backwards, with each transformations inverted, we must do that to get from world space to camera space.
Other things added Added rotations around the x axis, y axis, and z axis. https://en.wikipedia.org/wiki/Rotation_matrix
Code
The camera now has two angles as instance variables.
121
122
123@dataclasses.dataclass
124class Camera:
125    position_ws: mu3d.Vector3D = dataclasses.field(
126        default_factory=lambda: mu3d.Vector3D(x=0.0, y=0.0, z=15.0)
127    )
128    rot_y: float = 0.0
129    rot_x: float = 0.0
Since we want the user to be able to control the camera, we need to read the input.
147def handle_inputs() -> None:
...
Left and right rotate the viewer’s horizontal angle, page up and page down the vertical angle.
160    if glfw.get_key(window, glfw.KEY_RIGHT) == glfw.PRESS:
161        camera.rot_y -= 0.03
162    if glfw.get_key(window, glfw.KEY_LEFT) == glfw.PRESS:
163        camera.rot_y += 0.03
164    if glfw.get_key(window, glfw.KEY_PAGE_UP) == glfw.PRESS:
165        camera.rot_x += 0.03
166    if glfw.get_key(window, glfw.KEY_PAGE_DOWN) == glfw.PRESS:
167        camera.rot_x -= 0.03
The up arrow and down arrow make the user move forwards and backwards. Unlike the camera space to world space transformation, here for movement code, we don’t do the rotate around the x axis. This is because users expect to simulate walking on the ground, not flying through the sky. I.e, we want forward/backwards movement to happen relative to the XZ plane at the camera’s position, not forward/backwards movement relative to camera space.
171    if glfw.get_key(window, glfw.KEY_UP) == glfw.PRESS:
172        forwards_cs = mu3d.Vector3D(x=0.0, y=0.0, z=-1.0)
173        forward_ws = mu3d.compose(
174            [mu3d.translate(camera.position_ws), mu3d.rotate_y(camera.rot_y)]
175        )(forwards_cs)
176        camera.position_ws = forward_ws
177    if glfw.get_key(window, glfw.KEY_DOWN) == glfw.PRESS:
178        forwards_cs = mu3d.Vector3D(x=0.0, y=0.0, z=1.0)
179        forward_ws = mu3d.compose(
180            [mu3d.translate(camera.position_ws), mu3d.rotate_y(camera.rot_y)]
181        )(forwards_cs)
182        camera.position_ws = forward_ws
Ortho is the function call that shrinks the viewable region relative to camera space down to NDC, by moving the center of the rectangular prism to the origin, and scaling by the inverse of the width, height, and depth of the viewable region.
785def ortho(
786    left: float,
787    right: float,
788    bottom: float,
789    top: float,
790    near: float,
791    far: float,
792) -> InvertibleFunction:
793    midpoint = Vector3D(
794        x=(left + right) / 2.0, y=(bottom + top) / 2.0, z=(near + far) / 2.0
795    )
796    length_x: float
797    length_y: float
798    length_z: float
799    length_x, length_y, length_z = right - left, top - bottom, far - near
800
801    fn = compose(
802        [
803            scale_non_uniform_3d(
804                m_x=(2.0 / length_x),
805                m_y=(2.0 / length_y),
806                m_z=(2.0 / (-length_z)),
807            ),
808            translate(-midpoint),
809        ]
810    )
811
812    def f(vector: Vector) -> Vector:
813        return fn(vector)
814
815    def f_inv(vector: Vector) -> Vector:
816        return inverse(fn)(vector)
817
818    return InvertibleFunction(f, f_inv, "Ortho", "Ortho Inv")
We will make a wrapper function camera_space_to_ndc_space_fn which calls ortho, setting the size of the rectangular prism.
878def cs_to_ndc_space_fn(
879    vector: Vector3D,
880) -> InvertibleFunction:
881    return perspective(
882        field_of_view=45.0, aspect_ratio=1.0, near_z=-0.1, far_z=-1000.0
883    )
884
885
Event Loop
The amount of repetition in the code below in starting to get brutal, as there’s too much detail to think about and retype out for every object being drawn, and we’re only dealing with 3 objects. The author put this repetition into the book on purpose, so that when we start using matrices later, the reader will fully appreciate what matrices solve for us.
211while not glfw.window_should_close(window):
...
the square should not be visible when hidden behind the paddle1, as we did a translate by -10 in the z direction.
230    # cameraspace to NDC
231    with mu3d.push_transformation(
232        mu3d.ortho(
233            left=-10.0, right=10.0, bottom=-10.0, top=10.0, near=-0.1, far=-30.0
234        )
235    ):
236        # world space to camera space, which is mu3d.inverse of camera space
237        # to world space
238        with mu3d.push_transformation(
239            mu3d.inverse(
240                mu3d.compose(
241                    [
242                        mu3d.translate(camera.position_ws),
243                        mu3d.rotate_y(camera.rot_y),
244                        mu3d.rotate_x(camera.rot_x),
245                    ]
246                )
247            )
248        ):
249            # paddle 1 space to world space
250            with mu3d.push_transformation(
251                mu3d.compose(
252                    [
253                        mu3d.translate(paddle1.position),
254                        mu3d.rotate_z(paddle1.rotation),
255                    ]
256                )
257            ):
258                GL.glColor3f(*iter(paddle1.color))
259                GL.glBegin(GL.GL_QUADS)
260                for p1_v_ms in paddle1.vertices:
261                    paddle1_vector_ndc = mu3d.fn_stack.modelspace_to_ndc_fn()(
262                        p1_v_ms
263                    )
264                    GL.glVertex3f(
265                        paddle1_vector_ndc.x,
266                        paddle1_vector_ndc.y,
267                        paddle1_vector_ndc.z,
268                    )
269                GL.glEnd()
270
271                # square space to paddle 1 space
272                with mu3d.push_transformation(
273                    mu3d.compose(
274                        [
275                            mu3d.translate(mu3d.Vector3D(x=0.0, y=0.0, z=-1.0)),
276                            mu3d.rotate_z(rotation_around_paddle1),
277                            mu3d.translate(mu3d.Vector3D(x=2.0, y=0.0, z=0.0)),
278                            mu3d.rotate_z(square_rotation),
279                        ]
280                    )
281                ):
282                    # draw square
283                    GL.glColor3f(0.0, 0.0, 1.0)
284                    GL.glBegin(GL.GL_QUADS)
285                    for ms in square:
286                        square_vector_ndc = (
287                            mu3d.fn_stack.modelspace_to_ndc_fn()(ms)
288                        )
289                        GL.glVertex3f(
290                            square_vector_ndc.x,
291                            square_vector_ndc.y,
292                            square_vector_ndc.z,
293                        )
294                    GL.glEnd()
295
296            # paddle 2 space to world space
297            with mu3d.push_transformation(
298                mu3d.compose(
299                    [
300                        mu3d.translate(paddle2.position),
301                        mu3d.rotate_z(paddle2.rotation),
302                    ]
303                )
304            ):
305                # draw paddle 2
306                GL.glColor3f(*iter(paddle2.color))
307                GL.glBegin(GL.GL_QUADS)
308                for p2_v_ms in paddle2.vertices:
309                    paddle2_vector_ndc = mu3d.fn_stack.modelspace_to_ndc_fn()(
310                        p2_v_ms
311                    )
312                    GL.glVertex3f(
313                        paddle2_vector_ndc.x,
314                        paddle2_vector_ndc.y,
315                        paddle2_vector_ndc.z,
316                    )
317                GL.glEnd()
318
319    glfw.swap_buffers(window)